Saturday, November 27, 2010

My score. More to come!!

I recently went to a junkyard that is rumored to be crushing the cars they have because (as usual) the city is threatening - which is completely stupid considering its location. I will be going back soon so let me know if you are looking for something, I will make sure to save it.

Because really this is what is important. We need to keep this stuff, most of it is original design, one off thoughts and unique. Automotive design has really died, the only company doing anything interesting is Audi - (which started its life in racing and true to its form).

So...back on track - some stuff - seriously let me know if you are interested in anything!!

Bryan

Sunday, October 24, 2010

Been Awhile - but still busy

It has been awhile since I have updated everyone on this project. Alot of little things are now starting to come to fruition.

I have done the following:
Seam sealed the entire top side of the floor - from trunk to firewall.
Painted the entire floor as well.
Installed a new Master cylinder, though if I need to will replace it, though it is a dual diaphram 7 in power system.
Welded into place the 5 gallon air tank
Put in a mock-49 dash to help set the dash pieces in place and wired
Set up the wiring harness placement, though I haven't yet started to wire it
Fabricated the fuel filler tube and surround
Installed a holley carb to get it running, but will eventually replace it with an edelbrock
Removed the entire windshield glass and rubber moulding, and door panels


So..now it can stop, shift, turn, and move up and down

Still so much to do, but one step at a time.

Thursday, August 12, 2010

Front Seats Mounted

I haven't updated for awhile..although a lot has happened. I have been focusing on the floors and the other night I replaced the rear seat area. I will have pics in a later post along with the final rear seat placement.

However, tonight I made a major milestone..for me at least. I fabricated up the lower seat risers for the front thunderbird bucket seats. I have some finishing to do, but this is HUGE..now I can sit it in!!

Saturday, July 24, 2010

Why stop there? - New Rear Floors

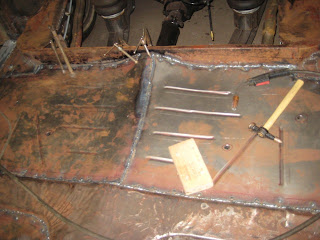
Yeah..well..once you get started..it is hard to stop. The rear floors were a bit weak as well - and I had a pretty good idea of how I was going to do it..so the next day - out they came. Spot weld were drilled out and I left enough flange on the original floor to weld to. Came in handy.

Step one - cut out the old floor - only 25 spot welds

Step two - make patterns

Step three - weld them in

Friday, July 23, 2010

New Front Floors

I just couldn't look past the rusty front floors and think to myself.."put in all this work..then try to weld front seats to that...so they had to go...two days and alot of fitting...all said and done..not bad for my first time.
Step 1 - cut out old floors

Step 2 - pattern new ones and bead them up

Step 3 weld them in.

Monday, July 12, 2010

Major Update - The body is BACK

Well...after the shifter being put in..and knowing what I have left to do on the body..I figured it was time to get the body back on the frame. I have the bushings for the body, and the rest is ready. So, on monday my buddy jeff, (who also helped me take the body off the frame) came over and helped put it back on.

There was one hitch..with the new rear suspension, I was going to need to rework the rear floor..so a little cut cut and it is done.

Also, with the bags all the way down it will ride about 7-8 inches off the ground. The top of the car is only 60 inches high. The ride height will be around 11-12 inches.

Sunday, July 4, 2010

Thank you Lokar - Shifter installed

In June I attended the NSRA in York PA car show. There are always vendors there selling the latest and greatest car parts. I was looking for a quick easy solution allowing me to use the existing column shift to shift teh new automatic transmission. Lokar makes a kit but everywhere it was about 60 bucks. One vendor had it for 45 I picked it up. With some slight modifications (hand bending the rod) to make the shifting work. It is now able to shift through all the gears - P-R-N-D-3-2-1.
Pretty quick and easy. It may look wrong..but it shifts perfectly.

Sunday, June 20, 2010

The hard part - #1 Driveshaft and Exhaust

Alot has been happening, but I haven't had time to update all my fans out there. I am to the point in this process of having to "send out" tasks. The driveline is incomplete without a drive-shaft. These things aren't rocket science, but if done poorly too many things can go wrong. So, I decided to call out to Florig Equipment in Conshohocken and after taking some measurements I dropped off some parts and three days later - picked up a the central piece to making this car run. You can see it in the middle


Also, the other large part of this process is exhaust. Well - I don't the tools to bend up my own exhaust and felt that it would be easier and quicker to have a shop do it. Well - guess what - not all shops do it. Luckily for me, the local midas at the end of my block has some really cool guys and they agreed to take it on.

It is a complete dual system including stainless steel mufflers, and 2 inch exhaust throughout. I chose 2 inch because I wanted a quiet car and it is more traditional than 2.5 or 3 inch.

Thursday, April 29, 2010

What's it worth??

I often get strange looks from my "professional" friends when I talk about old cars, working on engines, and going to car shows. I understand it, I don't know if they do all the time, but that's okay. That's why it is MY hobby, interest and some would call obsession.

So..last night i get this email from a guy i met recently at the Carlisle Show about these pieces that I have been looking for. They are simply used to open the doors for a car. Well - these are more than that..they are the coolest designed pieces ever. Yeah EVER!!!

From 1946 through 1948 the Lincoln company made a car called the Zephyr. Yep just like todays, however, this was a top of the line car, came with all the bells and whistles. Anyway, they were in limited production and often sold to only those who could afford them at the time. It was a two door coupe. Well, I got my hands on three of these buttons and I still can't believe it. Totally ripped up right now!!!

Check them out.

Rhinebeck NY - Adventures in Treasure Hunting


I am finally going to a show this weekend that I have been wanting to go to for a long..long. time.

Rhinebeck NY is in a quiet area of NY along the hudson river and a good 4 hours from me. Well I talked a buddy into going with me and we are planning on makeing it a 1 day trip, and get this - we plan on leaving at 3 am...yeah..3 AM.
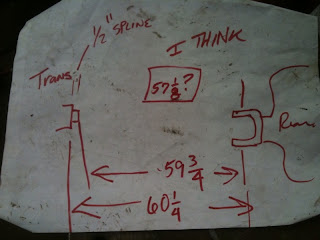
This car stuff is fun for exactly this reason. I get to travel and see areas that I would normally not, meet strange people and find some cool old junk.

Loongg Winter

You know..it is really hard to motivate yourself to work outside when it is cold. It is even harder when you don't have heat in the garage. So - that being said. I ripped it up the other night (in 50 degree weather) and got 4 major components started.

1. The fuel pump needed to be mounted to the frame and line run to the engine - DONE


2. Exhaust needed to be started from the SBC truck manifolds - DONE


3. Dimensions needed to be taken for the driveshaft - DONE

4. The rear axle trailing arm mounts needed to be welded solidly to the axle - DONE

Now onto RHINEBECK.